Tampilkan postingan dengan label to. Tampilkan semua postingan

And now back to the trailer

Senin, 15 Februari 2016

0 komentar
Remember the trailer? This one, the one that almost killed us?


We left the shantyboat hull pretty complete. Now that the boat is ready to be flipped, we turn our attention back to the trailer.

It is really a rusty, janky old thing. Ive owned it for fifteen years or so, or sorta owned it since I bought it with Sean for our Burning Man theme camp, the Costco Soulmate Trading Outlet. Its been stolen and recovered, broken and repaired on the road. We used to haul that thing back and forth loaded to the gills over the Sierra Nevada Mountains, taking our lives into our own hands. Then we realized that if we stored it in the desert, we could save wear and tear on our mortality. So there it stayed for about ten years.

When the camp realized it could buy a shipping container and have it dropped off at their campsite every year without the hassle of dealing with That Trailer, the poor thing got abandoned for a few years out in the Nevada wilds. You remember that I drove out to the desert with Alex to rescue our friend the trailer, a trip with nearly fatal results.

So here it is, a 20 foot flatbed, maybe suited to my shantyboat, maybe not, needing suspension work, a coat of paint, deck repair, and maybe some repair welds.


The first thing I did was fire up my cutting torch and cut off the weird distinctive triangle things, and ground down the cuts. I always assumed they were there as a token gesture to structural reinforcement.


I replaced all the deck bolts that had rusted through, grinding off and replacing any that had loosened. The deck needed about 50 new bolts. This alone made the deck much more stable.


I gave all the metal on the entire trailer, top and bottom, a new coat of Rust-Oleum. I had to get suited up to prevent myself from being painted too thoroughly, climbing under the trailer and applying paint overhead.

It looked pretty good when I was done. Though crawling around under the trailer, I saw several places where the metal was cracked, principally around the lateral beam that joined the two pairs of leaf springs on either side.

For a while, Id been sweating how to make the skids that would hold up the boat. I considered using recycled railroad ties since I could get them for free at the local trainyard, but their height and condition were too inconsistent. Eventually I got a ridiculous deal from a friend at the local lumberyard who found me some 6x6 treated lumber seconds that had a barely perceptible twist or were split a bit at one end.


I positioned the skids so one set would lie just inside of the skegs, and the other set so they lay at the outside edge of the trailer, as far out as could be secured. I figured this would support the boat along the stringers as well as give it side-to-side stability, something I thought would be extra important as we were trucking down the highway.


I drilled bolt holes through the skids and into the support brackets under the trailer.


I put big long 8 inch carriage bolts through the skids. For extra measure, I painted the bottom and tops of the carriage bolts. Lawrence joined me for a bit and serenaded me with excellent banjo tunes.


To prevent the skids from damaging the surface of the hull, I chamfered the sharp edges of the skids with my skill saw.


I cut the ends of each skid at an angle to guide the skegs while the boat was being trailered. Though honestly, I dont think the skegs at the back of the boat will be anywhere near the skids, since that end of the trailer will be deep under water and the back of the boat high above it during a boat launch or trailering. But it seemed like a good idea.


Then I covered the skids with indoor/outdoor low-pile carpet, stapling and using roofing nails at the edges.


The result was surprisingly legit looking.


Then Jen and I sat on the trailer and had a beer.  Something about this trailer makes you want to sit on it and have a drink.  Whats that about?

Next, the superhero of heavy duty welding flies the trailer high into the sky and melts it with his heat ray vision!


Read More..

On to St Barts

0 komentar
The last time I went ashore in St. Barts was 25 years ago. Ive sailed past it many times since because it is so  crowded to anchor. This time however was the same but different. The sail up wind from St. Martin was all done in 18- 25 knt winds taking 4 tacks to make the beautiful anchorage of Anse Du Colombier. Of course Wild Bird beat us there but only by about 15 minutes. Hogfish does well to weather pointing just as well as this 74" deep Van De Stat design but not fast enough to weather. We carried full sail easily but Wild Bird had a reefed main and Genoa.  I love chasing other boats as it really gets you to try and sail better to weather. We came in under sail and anchored right off the beach.


Rachel giving her best St. Barts pout. Hogfish and Wild Bird behind her.


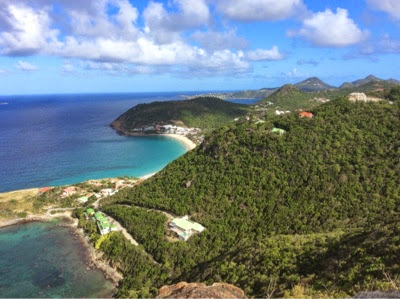
Hiking to the highest mountain around the next day shows how pretty it is and how many yachts are about in todays world. Being in the Carribean in the summer is different as not to many boats but you have to be ready to take off if I hurricane is coming.


The bay is getting smaller as we go up the trail.


At the top looking to the eastward. We are heading for the beach ahead and then will back track along the shore. All the roads here are poured in concrete with elaborate stone work every where. All the houses are built beautifully and are well built to withstand the storms sea and salt. I like the way they have been very careful in cutting into the hillsides on this island. Very little visible scaring.


Gayle posing along a standard road and rock wall. The grades here are like living in Knob hill in San Fransico. Very steep.


No snow and ice here so who cares!


These tortoises roam freely about the islands down here. Pip and Gem have no idea what this thing is.


Walking back along the shoreline.

.
Rachel spent a month a few years ago as a nanny to my old bosses new child on St Barts staying in his new villa. She had a blast and was spoiled rotten by him as he has done very well in life. Needless to say she likes St Barts very much.


These islands have lots of dry cactus areas on the windward sides as the rain tends to be dumped on the leeward side.


Rachel on Shell  beach. I found lots of broken sea glass that Iam sure was from the original Jack Sparrows drinking binges from years gone by on this beach.


Standard photo of the harbor. The intresting thing is so far most basic food items in the grocery stores are not much more than in the states. Resturants are different but still not by much. I think the U.S. Is getting to be very expensive. All the islands so far are better as when you buy a beer they are a buck or two. Try finding that in the states in a chichi place that has topless girls on the beach and its not a national crisis .


Eating lunch with David and Samina at their beach front house. Years ago I built a house for David in Grenada. I will be posting that story soon here. We all used to race on Davids yachts in the regattas down here. 

St. Barts is a very fun place . I could live here. They have a very good tax code. Unfortunately in the hurricane season you have to have a place to put your boat which is not here. The harbor is very crowded with tons of local boats on moorings plus all the charter yachts. You need a very good car here to drive up the inclines. Plus you will have to get used to looking at and being around lots of good looking people. Yes there were lots of topless girls about . Ill be back.
Read More..

Ive started to finish

0 komentar
The last few weeks have found me rushing around to get the boat weather tight, and starting to organize my thoughts on  how best to manage the build to the finish. Like most things on this project, a lot of work needs to be done in a certain order before progress becomes visible.

With winter sneaking up on us, I had to get the barn put back together. The  mornings are getting colder and with the heavy dew making its way in to the barn, some of my tools are showing signs of rust. It took me a weekend to frame the opening back in, find the correct insulation, and trim the door opening to be ready for the crew who were re installing the door. I have to be able to fabricate much of the wood work for the interior in the barn, so having it weather tight and able to be heated is a big deal to keep the boat build moving. As I write this post, the barn is now back together, and while its still a mess, it sure feels good to have all the space back.

The dry exhaust stack for the engine room is one of those deals that not much else can be started  until this part is finished. Getting this finished turned out to be a bit of a pain as some poor measuring on my part  had me doing a few  things over. I framed access panels  on both the port and starboard side of the stack. The port side panel is larger as to allow me to install the exhaust pipe through the panel. I also had to configure the panel opening to work around the microwave cabinet so I dont have to remove the cabinet to replace the exhaust pipe.

The  exhaust stack was the last big welding job I  have to do inside the boat, and it feels good to be able to take the big generator out of the back of my truck and leave it in the shop.

Now that the foam is all finished, I wanted to get the ceiling in the master cabin, and get that room pretty much wrapped up. The ceiling is 3 1/4" pine bead board painted an off white. To make things easy on myself, I primed and painted one coat of top coat paint on the boards to prevent bare wood from showing once things start moving around. The ceiling  job was pretty straight forward, and the only tricky part was building the removable access panel on either side of the center beam. The access panel is for throttle and engine controls, hydraulic lines for the anchor winch, hydraulic lines for the steering system, and some conduit. The center beam is about 3/8" lower than the ceiling, and instead of wrapping it in bead board, I decided to wrap it in Cherry. I needed a board over 10 long, and instead of joining two together to get the length, I found a long one on the bottom of my now air dried stack of lumber. The longest boards I have also  happen to be the widest boards. As you can see from this picture, this particular board is over 19" wide and dried pretty darn straight. After I finish milling the faux beam, Ill install it in a day or so, and the master cabin will have a finished ceiling in it.After the master cabin ceiling is finished, another day of work should have the guest cabin dressing room ceiling completed which will also mean all the ceilings below will be finished.

Another small detail I needed to get squared away was building a proper set of steps to get in to the boat. Ive been using a ladder, and given the amount of trips and quantity of material I have to get on the boat, the ladder was the old accident waiting to happen. I  also have a lot of people who like to stop by, and any thing I can do to prevent them or me from getting hurt helps everyone in the long run. I also want to do right by the boat yard, and keep my operation in such a way as to minimize any exposure.

The tooling I need to finish the job is also getting to the point where Im comfortable. I wish I would have built all the engine room cabinets before we move her, as it would be nice to be able to start organizing the floating shop. Once in a while I do find myself borrowing a tool off of my truck, but for the most part the boat is now tooled up.

Boat building and schedules dont seem to get along in Conallville, but I"m going to take another stab at it. My plan is to have the bulk of the wood work finished by sometime in January. Once the wood work is finished and coated with urethane, I can focus on getting the needed systems up and running for our May/June launch. Without going into a bunch of detail, the systems Im talking about are AC/DC electric, hydraulic, and engine controls.

Cheers


Read More..

Our Boat for Cape to Rio 2014

Sabtu, 13 Februari 2016

0 komentar
A few weeks ago I announced that we will sail in the Cape to Rio Race in January. If you missed it, you can read it here. Now I would like to tell a bit more about the boat.

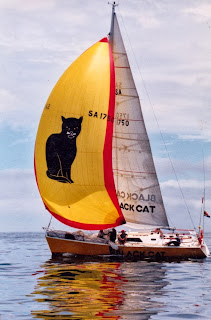
Her name is "Black Cat" and she is very special in my life. I designed her, I built her in my garden and I have sailed her across the South Atlantic three times. I have also raced and cruised her for many, many miles on the notorious Cape of Good Hope waters and she formed the foundation of my best selling range of boat designs. She is the prototype of the Didi 38 design and older sister to designs from the DS15 (Didi Sport 15) through to the DH550 .
"Black Cat" with her crew on launch day.
 I started concept sketches during the 1993 Cape to Rio Race on the Shearwater 39 "Ukelele Lady". "Ukelele" is very comfortable and carried us across the Atlantic in 29 days, excellent for a cruiser.  Still, I resolved part-way across  to do the next race on a boat of my own, which would be better able to take advantage of the downwind surfing conditions found on this race.

The new boat was to be cold-moulded wood. It was to be very light, with a big rig and deep bulb keel for high performance. Light and beamy boats are uncomfortable at sea and I sometimes get seasick, so I designed her relatively narrow for comfort. Narrow beam would also make her even faster.

I had nearly 3 years to build but I had a very big problem, I had no money to start. It was nearly a year before I had money to start building. Now the problem became a lack of time to build the cold-moulded boat, so I had to find an alternative solution that would be quicker to build.

My solution was to develop a method for building a rounded hull shape from plywood, using a radius chine form developed from my metal designs. I needed it to be mostly sheet plywood for fast construction but a rounded shape for performance, aesthetic and resale value reasons.

The resulting boat was 4 tons displacement in measurement trim and with 50% ballast ratio. She turned out to be clean, simple, pretty and a delight to sail. In two Cape to Rio Races she carried us across the Atlantic in 21 days in vastly different conditions. In one race she topped out as 18 knots and covered 250 miles in 24 hours. On the other her top speed was 22 knots but her 250 mile record went unbroken.

Where did her name come from? She is, after all, a yellow monohull and not a black catamaran. Black Cat is the top-selling peanut butter brand in South Africa and they sponsored her in the 1996 race. The kids knew her as the "Peanut Butter Boat" and her big  Black Cat spinnakers attracted a lot of attention.
Moving well in very light breeze.
She is quick on all headings in light breezes. The above photo was taken while racing on St Helena Bay in only 3-4 knots of breeze, a race in which she took line honours with a very comfortable lead over the 2nd placed boat, also a 38ft cruiser/racer.

She also loves to run free in a strong breeze. From cracked off on a fetch through to a run, she flies in strong conditions. Like me, she loves to surf. I surfed her at 22 knots down a very big wave mid-Atlantic after a storm.

Yet, she remains a home-built plywood boat and I look forward to spending 3 weeks with her and her crew as we cross the ocean once again. In the next few weeks I will write about the crew who will keep me and "Black Cat" company on this voyage.

To see our full range of designs, please visit http://dixdesign.com/ .

PS. Entries for the race currently stand at 26 boats, with another 19 pending. The race website is at http://www.cape2rio2014.com/ .

Read More..

How to build a roller furler for under 40

0 komentar

Ellies home-made sub-$40 roller furler
Introduction:

There are many different types of roller furling systems. This furler is a "Wykeham Martin" or "wire luff" type.  This popular design has been in continuous use worldwide for over 100 years.  It requires a jib that has a stainless steel wire sewn into the luff, or has a "jib set flying" (a jib that does not attach to a stay).  If your jib hanks onto a fixed forestay or needs to wind around a forestay this furler wont work for you. The furler you need would be more like this one.

This furler, as illustrated below, is sized for my 15 Welsford Navigator, or any similar sized small sailboat. It is comparable to a Ronstan RF76 or a Harken 434 dinghy furler.  It can be scaled up in size and strength for larger boats by substituting a stronger eye-bolt, stronger u-bolt, upper swivel, and ball bearing thrust bearing.

Here is a test run of the furler


Origin

In issue #58 of Small Craft Advisor magazine, Kirk Gresham wrote an excellent article on how he designed and built two roller furlers for his 17 cutter Eider for a mere $40 each using bits of scrap and a few bits and pieces of hardware from a local hardware store. This saved Kirk a whopping $670 off the $750 price tag he was quoted for two furler units from a local Port Townsend chandlery. I knew from the moment I read Kirks article that I wanted to build one of his furlers too. I love building things. Id much rather build something than buy it, even if it ends up costing me more. But in this case building it saved me a bundle too. Thats a two-fer for me!

I had some questions after reading the article, but I knew Kirk attends the Port Townsend Wooden Boat Festival every year, so I met Captain Kirk at the festival. He answered all of my questions and allowed me to take some close up photos of his furlers.


Being a mechanical designer by trade, naturally I couldnt resist making some improvements to the design.  I used bronze thrust washers in place of the steel radial bearings Kirk used, and I made the spool with a core of solid hardwood instead of using a section of PVC pipe.  These two changes significantly increase the strength of the furler, make it operate more smoothly and increase corrosion resistance. I also used an ABS end cap instead of the bent aluminum strap used to contain the furling line. It looks better and does a much better job of containing the line.

So, here I present my improved version of Kirks $40 roller furler.
Click to enlarge

Making the Drum Assembly

The drum is made from an inexpensive 3" ABS drain pipe end cap available at any home center that sells indoor plumbing supplies, like Home Depot, Lowes, Grainger, etc.  The cap I used is a Mueller 2979H.  (Note: a 3" cap is actually 4" in diameter.  It caps a 3" inside diameter drain pipe).  Caps are available in a variety of sizes if you want a larger or smaller furler. You will also need a stainless steel eye-bolt. I used a 1/4" x 4" Stanley V2161, but welded eye bolts are a better choice as they are much stronger. To make the drum assembly, drill a 1/4" hole in the center of the end cap for the eye-bolt. Drill 7/8" diameter holes every 45 degrees around the outside for access to the furling line. Locate these holes so they are 1/4" below the open end of the cap.
I also drilled a series of small drain holes in the bottom of the drum.
Use locktite to secure the two nuts on the eyebolt.

Making the Spool Assembly

To make the spool assembly, first I cut two plywood disks from 1/4" plywood. The outer diameter of the disks should be just slightly less than the inner diameter of the ABS cap. We dont want the furling line to slip through the gap and jam the furler. Sandwiched between the disks is a piece of oak (or any other hard wood) that is 2" in diameter and 7/8" thick. Glue these three pieces together taking care to align them accurately. Drill a 1/4" hole through the center for the eye-bolt. Drill two more holes to match the stainless steel U-bolt legs. The U-bolt I used is a 1/4" x 1-1/8" x 3-1/2" Stanley V2193. Drill one extra hole in the upper disk for the stop knot of the furling line. Paint the spool with several coats of enamel paint. Cut and file the legs of the U-bolt flush with the nuts. Use locktite to secure all four nuts.


Assembling the unit

To assemble the unit, place the spool onto the eyebolt of the drum assembly. Then add a 1/4" stainless steel washer, your thrust bearing, and a locknut. Additionally secure this locknut by drilling a tiny hole near the end of the eyebolt and adding a cotter pin, or use Locktite (blue not red).  The thrust bearing is simply two or three 1/4" I.D. sintered bronze thrust washers. These strong, inexpensive corrosion resistant self-lubricating washers should be readily available at any good hardware store, or you can order them here. Once in a great while, apply a drop of motor oil to the thrust washers. It will soak into the porous metal and lubricate them for a long time.

A ball bearing can be used instead of the thrust washers if you prefer. They are more expensive but may operate more smoothly under high tension.  The exact size you need will depend on the diameter of your eyebolt and the space available inside your u-bolt. The style of bearing you would want is shown below, and a source for stainless steel thrust bearings in many sizes is here.  Ive tested both the thrust washers and the ball bearings on my boat and there was no noticeable difference.


Tie a stop knot in the end of your furling line, feed it through the hole in the upper disk and out through one of the holes in the drum. Spin the spool to wind up the line.

Upper Swivel

A swivel is required at the head of your jib to allow the wire luff to spin and roll up the jib.  With this type of furler you want a swivel that spins easily. I have tested three different swivels on my boat that have worked well for me.

This anchor swivel, is a good choice provided your luff tension is not too tight.  If your jib uses a jib halyard, this swivel will work for you. It is extremely strong, very inexpensive, and spins well under moderate tension.  However, since its not a ball bearing swivel, it can stick when tensioned too much.

Ball bearing swivels are a better choice.  The Ronstan RF75 swivel is considerably more expensive, but is an excellent choice for larger sailboats with higher luff tensions.  And this jumbo sized (size 10) fishing swivel is an excellent choice for smaller sailboats and sailing dinghys.  It is the largest ball bearing fishing swivel Ive been able to find and works very well on my Navigator. It is rated to support up to 810 lbs.  Do not rely on this fishing swivel to hold up a mast on anything larger than a sailing dinghy.


A word about strength

Make sure you select components that are strong enough for your application. An easy and conservative way to do this is to look at the diameter of the stainless steel cable used to make your jibs luff wire.  My jib uses 1/8" cable, which has a Safe Working Load (SWL) of 352 lbs.  3/16" cable has a SWL of 740 lbs, and so on.  The SWL of each one of your components (eye-bolt, u-bolt, swivel, thrust bearing, shackles, etc) should be at least as high as that of your cables.  Youll be able to find the SWLs on the products packaging, at the manufacturers website, or with a bit of Googling. That way youll know your furler is stronger than your luff wire.

$40 furlers around the world

Click here to see Barrys UK version of this furler.
These young folks are enjoying their furler on their homebuilt catamaran
John Hows Fulmar
SailCanoeFan in Montreal  

Conclusion

This furler has performed flawlessly on my Navigator Ellie for over 5 years now, and I couldnt be more pleased with it.  If you have any feedback or if you build one of these furlers for yourself, Id love to hear about it.  Please leave a comment below.

.
Read More..

Copyright © 2014 Boat Plans Mania | Powered By Blogger