Tampilkan postingan dengan label for. Tampilkan semua postingan

Dave Immelman Professional Sailor looking for a Boat

Minggu, 14 Februari 2016

0 komentar
Those who followed our abortive Cape to Rio Race on the Didi 38 "Black Cat" and my recent blog posts about it will know that we went through situations that were demanding of quality seamanship, a cool head and total commitment to the well-being of boat and the other crew members. Those qualities come from thousands of miles sailed in all conditions, good and bad, sometimes under much pressure.

Our navigator on "Black Cat" was professional sailor David "Wavy" Immelman and he proved to have all of those qualities and more to spare. At any time that there was tough work to be done on the boat, Dave was there to do it or to assist. We had never sailed together before but Dave proved to be very capable and a sailor with whom I will be very happy to sail in the future.

Dave had prepared the boat for the race and onward voyaging. He was to take over as skipper after my departure in Rio and was to take her to the Caribbean for cruising and racing. He had committed to the owner of "Black Cat" for long term voyaging and racing. Unfortunately those long-term plans disappeared into the blue with our rudder, so Dave is looking for another boat.

Dave Immelman is RYA Ocean certified, with experience that includes Volvo Ocean Race, Americas Cup and Solent Racing. He is also tough, having rowed single-handed across the North Atlantic.

If you know of a racing, cruising or charter boat that may have a suitable opening, please message me so that I can put you in contact with Dave to supply his CV.
Read More..

Search for Missing Yacht in North Atlantic

0 komentar
Last week a 12m yacht, the "Cheeki Rafiki",  sailing from Caribbean to UK, started taking on water in mid-Atlantic. They were obviously in a serious situation and contact with the yacht was lost early hours of Friday when about 600 miles off Cape Cod, Massachusetts. A search was started by the United States Coast Guard and the upturned hull of a sailboat was spotted by a tanker crew that reported it but did not investigate further. The search was called off by USCG on Sunday, about 48 hours after the search started.

The USCG press release said "We appreciate the assistance of the U.S. Air Force, Canadian and the three merchant vessels helping us to conduct a thorough search so far from shore," said Capt. Anthony Popiel, 1st Coast Guard District chief of response. "We are extremely disappointed that we were not able to locate the sailors during the course of this extensive search. Our thoughts and prayers are with their families during this difficult time."

There followed a huge outcry against calling off the search so soon and it has been resumed today. This was after many thousands of people signed petitions calling on the USCG to resume the search and many private yacht owners vowed to go out there in their own boats to search if the USCG would not do it.

I have some questions.

1)  Isnt it a primary function of the USCG to go out there and search for whoever is missing or in trouble? This is a department of US government, paid for by the people. Is it that strapped for cash that it cant search longer than 48 hours for four people who are in dire straits, when they have a pretty good idea of where they are?

2) We have watched with fascination how carefully the Southern Indian Ocean has been searched for a missing aircraft. I accept that searching for a missing yacht or liferaft with four people aboard cant be compared with a search for a plane with hundreds. But they know where this boat is, it was even seen from a ship. They are not guessing or relying on foggy evidence to locate a start point for the search. The boat is there and it is/was afloat. If the crew abandoned ship into the liferaft, as seems the most likely scenario, the raft is likely to be downwind or downcurrent, or a combination of the two, of the position of the abandoned yacht. Why would the USCG assume that the crew were in the water and unable to survive when they had a liferaft available for just such an emergency? People have survived for many months in liferafts, surviving tumultuous storms and everything else that nature has thrown at them before eventually being found.

3) Isnt it maritime law that seamen are required to assist each other when in distress? A report in Metro News says that "the overturned hull of the boat was spotted by a passing tanker shortly after they disappeared but it was not inspected as there was no sign of the crew". People have survived in capsized or even sunken boats for considerable time, about two weeks in the most recent case. Why would the captain of the ship not stop his vessel and investigate. He saw the capsized boat. Unless it was storm conditions he should have been able to launch a boat to cross to the yacht. Banging on the hull and listening for a response would have told them if anyone was alive inside. Seeing it, reporting it and moving on did nothing to assist the crew aside from recording a start point for the search. Is commercial profit so important to the ships owners that they would not do everything in their power to ascertain that there was nobody there to rescue?

Thanks for reading my rant.
Read More..

Chine runners for flat bottomed sailboats some thoughts

Sabtu, 13 Februari 2016

0 komentar
32 years ago I owned a 21 San Juan centerboard sloop. I had bought it for $1,000.00 with the mind to clean it up sail it a bit and resell her. This fiberglass design had a long drop cast iron keel that you would hoist up with a hand crank trailer boat winch through a big hole in its trunk. I learned very quickly that this set up was a nightmare to try and stop the ingress of water into its cabin. I also learned that when you hit the bottom with this heavy metal keel it would shake the boat like you had just lost all the ocean out from under you and dropped to the sea bed. Needless to say when in anything that looked like shallow water up it went and away would we start sliding to leeward on our crabbing passage to our anchorage. I learned I would never want this set up. I sold the boat for $3,000.00 which you could still do back then. I at times owned up to 8 boats that I was buying with the mind to fix up , learn it bit and then resell. Ive never lost money on a boat... Yet.
When I met and sailed with Jim Melchor on his Phil Bolger designed Mannatee yawl I got hooked on shallow water capable sailing vessels. I loved the way he could just sail about in 2-1/2 -3 of water without worry. The mizzen sail offset on the stern was so radical. Who was this guy Bolger that said you could do this and not follow convention ?


Jim sailing Alert in shallow water. The leeboard acts like a a simple long low aspect keel. Its design has been around for centuries.

Jim Melchor asked if he could finish one of his sons Bolger Black Skimmer leeboard Yawl designs in my custom boat building shop " Back Bay Boats" in Tavernier in Key Largo. Sure! After Jim launched we sailed that boat every chance we got.
I loved just watching the water flow around its simple exterior 2x4 chine logs. Who would of thought of doing this to make it easier for amature builders. Oh yea, to hell with convention.
I owned a Herrshoff Prudence sloop at time that I had built with all matching bronze hardware. Here was a designer I could follow in my own personal life. 
This boat was very stiff and fun to sail but had a wicked weather helm at times. The hull scantlings were way too light for me. The hull looked like it would not last long if not looked after carefully. In reality it did not. These boats with butt blocked plywood panels and one layer of Dynel cloth just do not hold up.
The next intresting boat I came across I had only heard about through my sailing  friends Michel and Idda Little. They had built a smaller Bolger double ended leeboard cat rigged 30re. They only sailed it a very short distance from Key West to the Marquesas keys to camp out on for the winter. You could do that back in those days. They have written a great book on camp cruising small boats.
From them I heard of this kid that they had met named Matt Layden. They said he was living aboard and crusing in a 13 cat rigged flat bottom dinghy that had a cabin top. And the thing that they wanted me to know was that it had no Keel, leeboard, daggerboard or anything. They said he sailed everywhere on just the chine !
It would take many years later before Matt and I finally met up in the Exumas. 
See pictures in an earlier blog.
During this time frame I decided to design and build my own shoal draft yawl. I wanted a very ocean capable boat but also very capable to really sail across very shoal waters with out the need for an engine. Between this time frame I looked up Henry Scheels keel design for reducing draft on production standard keels. The Austrailans had won the Americas cup with a wing keel. 
I had seen how easy the water flowed around the Bolger 2x4s.
This guy Matt was sailing all over with just his Chines. 

So what I figured was that I would kjust spread out a Scheel keel to both sides of the hull bottom.
The boat only sails on one side of its keel at a time. The hull sides would act like a leewards low slung flat surface... Except that I could use the whole side of the boat.

I ended up putting this chine edge down the whole length of the first Hogfish design. Pete Culler in his book on Skiffs and Schooners goes on to say you should never have a hard chine boat with a protruding exterior chine or the boat will trip and be very unsafe. Well Bolger must have not read Petes book. 
This chine protrusion, lip, extension, winggy thing what ever I feel works very well to stop the slipping you would otherwise get with out it. I have learned much since meeting Matt Laden, comparing boats and ideas. Now mine are very short. As in 12 long on HFM. Not too big. 
I can see how they work when I pull up my daggerboard or when I raise the centerboards on the other two Hogfish designs. 
BUT they do not give lift, not like some wing Keels can. They work best when the boat is hard pressed and heeling over in a breeze. If its light winds and we are trying to sail to weather in 4 of water the sails cannot be sheeted in too tight. As the breeze increases then you can see and feel the dig. You can see the grip by looking over the stern at the wake.
This is very low tech stuff here.
Lots of people dreaming of a shoal water simple boat would love to not have to build a board into their boat and also give up that space.
A Chine keel- wing like this WILL NOT WORK in anything bigger than maybe 18.
Why because you will need to use human ballast to lean the boat over to get it to dig in. This is impractical. Windage comes in to play. 
Its a good addition for gunk holers as a simple thing to add when building your boat.


This is what I would suggest putting on my H-28 for about 8-10


Heres showing what I feel is the difference between a traditional vee bottom and the Hogfish types.
See the difference in vee in going to windward in a decent breeze. The vee bottoms bow gets flatter.
Notice the freeboard. Must reef earlier in the upper boat.
Thats as far over as the HFM sails in 20-28 knts with one reef in the main.


Showing a box boat. Ive never seen a picture of one in strong winds so Iam only speculating here.
If you have some pictures in a strong breeze please send me some. 


To finish up heres some thoughts on rudder depths. Some loose drawings of contemporay designs and their rudder depths. Ill go offshore in any of those that go below the hull bottom. The others will be very hard pressed in a breeze as they will have to shorten their sail to handle the speeds and loads.
If you have no offshore sailing plans than no big deal. 

Rained all this afternoon today so no more work re installing Wild Birds deck Hardware. Time to write a post while Rachel cooks dinner.


Its Movember , mustache month. Rachel and I having lunch between squalls today.

Later...


Read More..

Our Boat for Cape to Rio 2014

0 komentar
A few weeks ago I announced that we will sail in the Cape to Rio Race in January. If you missed it, you can read it here. Now I would like to tell a bit more about the boat.

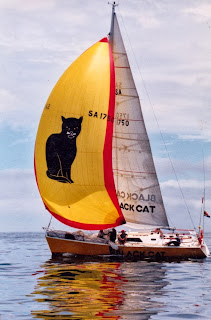
Her name is "Black Cat" and she is very special in my life. I designed her, I built her in my garden and I have sailed her across the South Atlantic three times. I have also raced and cruised her for many, many miles on the notorious Cape of Good Hope waters and she formed the foundation of my best selling range of boat designs. She is the prototype of the Didi 38 design and older sister to designs from the DS15 (Didi Sport 15) through to the DH550 .
"Black Cat" with her crew on launch day.
 I started concept sketches during the 1993 Cape to Rio Race on the Shearwater 39 "Ukelele Lady". "Ukelele" is very comfortable and carried us across the Atlantic in 29 days, excellent for a cruiser.  Still, I resolved part-way across  to do the next race on a boat of my own, which would be better able to take advantage of the downwind surfing conditions found on this race.

The new boat was to be cold-moulded wood. It was to be very light, with a big rig and deep bulb keel for high performance. Light and beamy boats are uncomfortable at sea and I sometimes get seasick, so I designed her relatively narrow for comfort. Narrow beam would also make her even faster.

I had nearly 3 years to build but I had a very big problem, I had no money to start. It was nearly a year before I had money to start building. Now the problem became a lack of time to build the cold-moulded boat, so I had to find an alternative solution that would be quicker to build.

My solution was to develop a method for building a rounded hull shape from plywood, using a radius chine form developed from my metal designs. I needed it to be mostly sheet plywood for fast construction but a rounded shape for performance, aesthetic and resale value reasons.

The resulting boat was 4 tons displacement in measurement trim and with 50% ballast ratio. She turned out to be clean, simple, pretty and a delight to sail. In two Cape to Rio Races she carried us across the Atlantic in 21 days in vastly different conditions. In one race she topped out as 18 knots and covered 250 miles in 24 hours. On the other her top speed was 22 knots but her 250 mile record went unbroken.

Where did her name come from? She is, after all, a yellow monohull and not a black catamaran. Black Cat is the top-selling peanut butter brand in South Africa and they sponsored her in the 1996 race. The kids knew her as the "Peanut Butter Boat" and her big  Black Cat spinnakers attracted a lot of attention.
Moving well in very light breeze.
She is quick on all headings in light breezes. The above photo was taken while racing on St Helena Bay in only 3-4 knots of breeze, a race in which she took line honours with a very comfortable lead over the 2nd placed boat, also a 38ft cruiser/racer.

She also loves to run free in a strong breeze. From cracked off on a fetch through to a run, she flies in strong conditions. Like me, she loves to surf. I surfed her at 22 knots down a very big wave mid-Atlantic after a storm.

Yet, she remains a home-built plywood boat and I look forward to spending 3 weeks with her and her crew as we cross the ocean once again. In the next few weeks I will write about the crew who will keep me and "Black Cat" company on this voyage.

To see our full range of designs, please visit http://dixdesign.com/ .

PS. Entries for the race currently stand at 26 boats, with another 19 pending. The race website is at http://www.cape2rio2014.com/ .

Read More..

How to build a roller furler for under 40

0 komentar

Ellies home-made sub-$40 roller furler
Introduction:

There are many different types of roller furling systems. This furler is a "Wykeham Martin" or "wire luff" type.  This popular design has been in continuous use worldwide for over 100 years.  It requires a jib that has a stainless steel wire sewn into the luff, or has a "jib set flying" (a jib that does not attach to a stay).  If your jib hanks onto a fixed forestay or needs to wind around a forestay this furler wont work for you. The furler you need would be more like this one.

This furler, as illustrated below, is sized for my 15 Welsford Navigator, or any similar sized small sailboat. It is comparable to a Ronstan RF76 or a Harken 434 dinghy furler.  It can be scaled up in size and strength for larger boats by substituting a stronger eye-bolt, stronger u-bolt, upper swivel, and ball bearing thrust bearing.

Here is a test run of the furler


Origin

In issue #58 of Small Craft Advisor magazine, Kirk Gresham wrote an excellent article on how he designed and built two roller furlers for his 17 cutter Eider for a mere $40 each using bits of scrap and a few bits and pieces of hardware from a local hardware store. This saved Kirk a whopping $670 off the $750 price tag he was quoted for two furler units from a local Port Townsend chandlery. I knew from the moment I read Kirks article that I wanted to build one of his furlers too. I love building things. Id much rather build something than buy it, even if it ends up costing me more. But in this case building it saved me a bundle too. Thats a two-fer for me!

I had some questions after reading the article, but I knew Kirk attends the Port Townsend Wooden Boat Festival every year, so I met Captain Kirk at the festival. He answered all of my questions and allowed me to take some close up photos of his furlers.


Being a mechanical designer by trade, naturally I couldnt resist making some improvements to the design.  I used bronze thrust washers in place of the steel radial bearings Kirk used, and I made the spool with a core of solid hardwood instead of using a section of PVC pipe.  These two changes significantly increase the strength of the furler, make it operate more smoothly and increase corrosion resistance. I also used an ABS end cap instead of the bent aluminum strap used to contain the furling line. It looks better and does a much better job of containing the line.

So, here I present my improved version of Kirks $40 roller furler.
Click to enlarge

Making the Drum Assembly

The drum is made from an inexpensive 3" ABS drain pipe end cap available at any home center that sells indoor plumbing supplies, like Home Depot, Lowes, Grainger, etc.  The cap I used is a Mueller 2979H.  (Note: a 3" cap is actually 4" in diameter.  It caps a 3" inside diameter drain pipe).  Caps are available in a variety of sizes if you want a larger or smaller furler. You will also need a stainless steel eye-bolt. I used a 1/4" x 4" Stanley V2161, but welded eye bolts are a better choice as they are much stronger. To make the drum assembly, drill a 1/4" hole in the center of the end cap for the eye-bolt. Drill 7/8" diameter holes every 45 degrees around the outside for access to the furling line. Locate these holes so they are 1/4" below the open end of the cap.
I also drilled a series of small drain holes in the bottom of the drum.
Use locktite to secure the two nuts on the eyebolt.

Making the Spool Assembly

To make the spool assembly, first I cut two plywood disks from 1/4" plywood. The outer diameter of the disks should be just slightly less than the inner diameter of the ABS cap. We dont want the furling line to slip through the gap and jam the furler. Sandwiched between the disks is a piece of oak (or any other hard wood) that is 2" in diameter and 7/8" thick. Glue these three pieces together taking care to align them accurately. Drill a 1/4" hole through the center for the eye-bolt. Drill two more holes to match the stainless steel U-bolt legs. The U-bolt I used is a 1/4" x 1-1/8" x 3-1/2" Stanley V2193. Drill one extra hole in the upper disk for the stop knot of the furling line. Paint the spool with several coats of enamel paint. Cut and file the legs of the U-bolt flush with the nuts. Use locktite to secure all four nuts.


Assembling the unit

To assemble the unit, place the spool onto the eyebolt of the drum assembly. Then add a 1/4" stainless steel washer, your thrust bearing, and a locknut. Additionally secure this locknut by drilling a tiny hole near the end of the eyebolt and adding a cotter pin, or use Locktite (blue not red).  The thrust bearing is simply two or three 1/4" I.D. sintered bronze thrust washers. These strong, inexpensive corrosion resistant self-lubricating washers should be readily available at any good hardware store, or you can order them here. Once in a great while, apply a drop of motor oil to the thrust washers. It will soak into the porous metal and lubricate them for a long time.

A ball bearing can be used instead of the thrust washers if you prefer. They are more expensive but may operate more smoothly under high tension.  The exact size you need will depend on the diameter of your eyebolt and the space available inside your u-bolt. The style of bearing you would want is shown below, and a source for stainless steel thrust bearings in many sizes is here.  Ive tested both the thrust washers and the ball bearings on my boat and there was no noticeable difference.


Tie a stop knot in the end of your furling line, feed it through the hole in the upper disk and out through one of the holes in the drum. Spin the spool to wind up the line.

Upper Swivel

A swivel is required at the head of your jib to allow the wire luff to spin and roll up the jib.  With this type of furler you want a swivel that spins easily. I have tested three different swivels on my boat that have worked well for me.

This anchor swivel, is a good choice provided your luff tension is not too tight.  If your jib uses a jib halyard, this swivel will work for you. It is extremely strong, very inexpensive, and spins well under moderate tension.  However, since its not a ball bearing swivel, it can stick when tensioned too much.

Ball bearing swivels are a better choice.  The Ronstan RF75 swivel is considerably more expensive, but is an excellent choice for larger sailboats with higher luff tensions.  And this jumbo sized (size 10) fishing swivel is an excellent choice for smaller sailboats and sailing dinghys.  It is the largest ball bearing fishing swivel Ive been able to find and works very well on my Navigator. It is rated to support up to 810 lbs.  Do not rely on this fishing swivel to hold up a mast on anything larger than a sailing dinghy.


A word about strength

Make sure you select components that are strong enough for your application. An easy and conservative way to do this is to look at the diameter of the stainless steel cable used to make your jibs luff wire.  My jib uses 1/8" cable, which has a Safe Working Load (SWL) of 352 lbs.  3/16" cable has a SWL of 740 lbs, and so on.  The SWL of each one of your components (eye-bolt, u-bolt, swivel, thrust bearing, shackles, etc) should be at least as high as that of your cables.  Youll be able to find the SWLs on the products packaging, at the manufacturers website, or with a bit of Googling. That way youll know your furler is stronger than your luff wire.

$40 furlers around the world

Click here to see Barrys UK version of this furler.
These young folks are enjoying their furler on their homebuilt catamaran
John Hows Fulmar
SailCanoeFan in Montreal  

Conclusion

This furler has performed flawlessly on my Navigator Ellie for over 5 years now, and I couldnt be more pleased with it.  If you have any feedback or if you build one of these furlers for yourself, Id love to hear about it.  Please leave a comment below.

.
Read More..

Obtaining Plans for Your S S Boat

Jumat, 12 Februari 2016

0 komentar
All plans for boats designed by Sparkman & Stephens from design numbers 1 - 2,600 are in storage at Mystic Seaport Museum in Mystic, Connecticut. They are archived in a purpose built, museum quality building that protects them from fluctuations in temperature and humidity and from fire.

Designs generated after design number 2,600 were generally done using CAD (computer aided design) and are kept on our file server.

Plans for designs 1 - 2,600 must be obtained from Mystic Seaport Museum. To obtain plans for your boat please click here to access the Mystic Seaport webpage regarding the S&S plan collection which explains the process, the costs involved and contact information. You are welcome to email us to obtain a list of available plans for your boat. Please click here to email us.

We still maintain the intellectual property on all of the plans in the collection but Mystic Seaport handles any actual plan reproduction. For information on yacht construction using existing designs and royalty payments please click here.
Read More..

A Need for Speed

Selasa, 09 Februari 2016

0 komentar


I met Robert Ditterich back when he was building a Waller 540. Id never heard of the Waller design, which is no surprise, Robert lives on the flipside of the globe. There is a substantial amount of skinny water in and around Australia, so boats with shallow draft have an advantage long capitalized by designers.
My love affair with traditionally designed and built boats is largely due to their simple and exquisite beauty. Traditionalists like me tend to hyperbole about how these old hull and sail types are the equivalent to new production designs. You hear often about how a lug sailed dingy traded tacks with a Laser all afternoon.
That may be the case, I wasnt there to verify any of those accounts. A fact I can verify is, if you want a boat that performs well in all conditions and is fast to boot, you need a design like Roberts Waller 540.


Ok, so I like a good turn of speed. I was reminded of this a couple days ago when we went for a row in Port Townsend Bay. The weather built up to a bluster on the way home and rowing with some difficulty, we kept pace with a couple walking the path along the shore. Until recently, human and sail powered boats have been what an old sailing mentor of mine called "slugs on the water".


But now we have boats that will sail at the speed of the wind. Hard to wrap your mind around, isnt it? This morning, the question of velocity came up again while reading Earwigoagin and an account of how the Gougeon brothers built an i550 design by Chris Beckwith, for this years aborted Everglades Challenge. The i550 is an 18 foot sportboat, built for racing, a boat designed to go as fast as the wind. Why be satisfied with five knots when you could be going ten?


Last month, on a whim, I drove to Bainbridge Island to check out a guitar. The owners lived in one of the swank neighborhoods circumjacent along the islands waterfront. The woman was a musician and her husband was a cabinetmaker and a sailor. Theyd built their home themselves.
It took me four hours to buy that guitar.
On the way out, I was shown their sportboat. The way theyd been talking about her speed, I expected a motor boat, but was pleasantly surprised to see a very fast looking sail design, 28 feet long, with kevlar and carbon fiber everywhere. This boat had recently spent a couple seasons eating up the competition around Seattle.


Wow. Then there is the story of Webb Chiles ongoing circumnavigation in his Moore 24, Gannet. Webb has an appreciation for small, simple boats and demonstrates they are capable of much more than we give them credit for. He also has a need for speed. His Gannet is similar in size to my Belle Starr, but in fifteen knots of wind, he is sailing at a spectacular ten knots.
I would be back there, somewhere, making nearly five........


 Whoa, doryman! What happened to "less is more"?


Whew, got a little carried away there. On a less astral plane, lets consider the cs20. B&B Yacht Design has here a boat for everyman. Performance in a builder friendly design.
Ive had the privilege of sailing with Randy Jones on his Core Sound 17, pictured here. A boat that sails itself and practically builds itself, too.
The Core Sound 20 is bound to be that much better.

Who knows what may become of this?........


The only photo I can take credit for is the last one. The others belong to friends mentioned and to them I extend thanks.
Read More..

The Design Process for Custom Yachts

Senin, 08 Februari 2016

0 komentar

The following is an overview of the design process for custom yachts.

Preliminary Design & Engineering Phase
This is the first step in the design process whereby your requirements are studied to determine if a satisfactory solution exists. This evaluation takes the form of preliminary plans, typically a General Arrangement, Sail Plan, Outboard Profile and Deck Plan. At the same time basic naval architecture and engineering estimates are made to verify that the concept is technically feasible and not just a "pretty picture". This is also the time to study alternatives solutions, before the work progresses too far.

Tank Testing
Although not always necessary, tank testing plays a vital role in the design of a yacht. Sparkman & Stephens has been tank testing yacht hulls since 1936. Tank testing results can be used to validate resistance, powering prediction software (we use multiple software packages for comparison), fuel consumption and range calculations, provide visual observation regarding spray generation, wave making and vessel attitude.


Tank testing can also be used to test the yacht in various sea states, under power and even at rest. We will normally test appendages such as skegs, stabilizers, propeller struts, and bilge keels for optimization.

Contract Design & Engineering Phase
The goal of this stage is to obtain competitive bids from the yards. Once a technically feasible and acceptable preliminary design is obtained and approved, we then undertake the contract design work. For the contract design stage we would refine and embellish the work done in the preliminary design stage, develop Typical Construction Plans, and undertake the necessary naval architecture and engineering calculations in support of this work.

A key part of this stage is the specification which would include all the major equipment, their manufacturer and model number, along with various schematics of the acoustic treatment, and of the engineering systems. In the case of a competitive bid situation, the plans, and in particular the very detailed specification, insure that the yards are bidding on the same boat, minimizing the number of assumptions made by them. This means that all the yards are "playing on an even field".

In the event a client decides to go to a sole source, then we would provide a "bullet list" specification. This type of specification is much reduced in scope, but does identify every major piece of equipment by manufacturer and model number. In this way you can be assured that the yard is providing you a price for the boat that you want, again with a few assumptions.

Identifying Candidate Yards
There are several factors which influence the choice of yards for the bidders "short list":
-Choice of hull construction material. Most yards specialize in a particular material. In addition, as the yacht increases in size fewer and fewer yards can physically accommodate the project. Therefore size and scantling materials limit the choice of yards.
-Level of quality required. This is a difficult variable to quantify. An analogy with automobiles is probably the best way to explain this point. All automobile manufacturers provide reliable and comfortable transportation. However, there is a real and perceived difference in quality between the car makers. The same is true of boat yards.
-Geographic location of the yard. Some clients like to be very intensely involved in the construction process, and therefore prefer yards close to their home and office.
-Special financial conditions. The "market" often provides opportunities which are worth pursuing. This may take the form of favorable exchange rates, government subsidies, or a yard that, for various reasons, decides to provide a low price.

There is risk and reward associated with the above choices. At Sparkman & Stephens we have worked with dozens of yards throughout the world. As a result of this extensive experience, we feel very comfortable in assisting you through the yard selection process.

Evaluation of Yard Bids
Upon receipt of the bids, be they competitive or sole source, we would assist you in an analysis of the bids. Based on our experience, we have compiled a substantial amount of price and man hour data. This allows us to determine if the yards are being realistic in terms of material costs, labor hours, total cost of the project, and the duration of the construction period.

We believe there is such a thing as too good a price. What is meant by this is the yard may not deliver the yacht consistent with your expectations. There are several consequences of this as follows:
-The yacht may not be to the quality you expect.
-The yard could request additional funds to complete the yacht.
-The yard could go bankrupt.

We feel we have an obligation to advise you of the potential risks of working with a yard which, in our view, has misjudged or misunderstood the quality or scope of work you require. This evaluation has served our clients extremely well over the years.

Non-Legal Advice on the Construction Contract
While we do not offer ourselves as lawyers, again on the basis of our experience with many yards and many contracts, we can provide assistance to your attorneys in formulating a yard contract. Also, being familiar with the construction process, the process of how changes to the yacht are made, and decisions during the construction process, we know where the usual problems occur. Accordingly, we can advise you of ways to protect your interests.

Final Design & Engineering Phase
This is the last stage of the design process, and is the real "meat" of the project. We believe very strongly in complete and detailed design and engineering. It is absolutely critical that the naval architect provide the shipyard as much information as is possible to produce the yacht. Based on this information an experienced yard can develop the necessary shop drawings for the construction of your yacht.

Many yards building large yachts have design and engineering staffs of their own which are very useful in the course of building the vessel. It is important, however, for the naval architect to coordinate the technical process. This is because the naval architect is directly employed by the client to oversee his interests, while the shipyard is working on a contract basis and is trying to save man-hours and material costs wherever possible.

Often the Plan and Calculations List expands or contracts based on how you want to structure the project. For example, should you decide to use an interior designer, the plans associated with this work would be dropped from our list. There are also some technical drawings that the yard can provide. However, these plans should be subject to the review and approval of the naval architect.

The reason for this is straightforward. A yacht is a floating object containing many systems which must be integrated. For example, if you add a Satcom to the navigation station/electronics equipment, this decision will impact the electrical system, aesthetics, weights, trim, stability, and a structural support must be designed which is integrated with the rest of the yachts structure. For this reason the naval architect is in the best position to coordinate all of these aspects.

Coordination of Outside Consultants
We are very comfortable undertaking all engineering aspects for the design of a typical yacht, but are not too proud to seek assistance from other professionals, when the need arises. For example, we would specify the acoustic treatment for a typical level of noise attenuation. Should you want an ultra-quiet yacht, then we would recommend involving an acoustics expert to assist us in achieving your goals. Again, for the reasons mentioned above, we feel this should be coordinated through the naval architect.

Equipment Procurement Assistance
In the course of designing yachts built all over the world for an international clientele, we become acquainted with a wide variety of equipment. In this way we are familiar with some of the best equipment for the job, and invoke this equipment in the specification. Should you or the yard need assistance in contacting manufacturers or their agents, we can save you time by assisting you in making the contact, or with the purchase itself.

Yard Inspections
While we pride ourselves on providing a very complete design and engineering package, we are also realistic about deviations which can be made from the plans, and changes which inevitably occur in the course of construction. For these reasons we consider inspections important to the success of the project. It helps us to establish a working technical liaison with the yard, allows us to resolve any problems and respond to any questions which inevitably arise during the course of the construction. The inspections also allow us to monitor progress and quality of the work on your behalf.

Review Requests for Yard Progress Payments
Typical contract terms are to make payments based on construction progress. As we are involved in technical dialogue with the yard during the entire construction process, and undertake inspection trips, we are in a good position to advise you when progress satisfies the payment terms of the contract.

Evaluate Yard Extras and Credits
In a project of the size and complexity of a custom yacht, it is inevitable that changes will be made. During the construction process the design will change from two dimensional drawings to three dimensional reality. As a result, it is not unusual for an owner or his design team to want to make some adjustments at this time. It should take about a year to build an average size yacht and two or three years to build a large yacht. In this period of time there will inevitably be changes in technology resulting in new materials and equipment which better suit your needs. It is important, therefore, to allow for a level of flexibility during the construction process.

If your design team (exterior stylist/interior designer, and naval architect/engineer) have sufficient time prior to construction to complete their work, then this would minimize the number of other changes. It has been our experience, under proper conditions, for extras to be within 5%.

On the basis of our experience with many yards over many years, we are able to advise you whether or not the yard is being fair concerning their charges for materials and labor hours associated with an extra or a credit.


Sea Trials
The sea trials are the culmination of everyones efforts. While the construction process has been monitored very carefully, and some systems have been run prior to launching, the "acid test" is the sea trials. Our typical specification has several pages devoted to the extent of the sea trials, and its protocol.

Sparkman & Stephens would expect to be present during the sea trials to undertake measurements and assist in the evaluation of all operating aspects of the yacht. Inevitably the trials uncover a short list of deficiencies which we would help identify, along with suggestions for correcting these deficiencies.

Assistance During Hand-Over Process
This is the day you become the proud owner of your new yacht. Often there are a few items either unfinished, back ordered, or to be corrected, and, of course, there is a tremendous amount of paperwork and money changing hands. Having been involved in this process in the past, we can provide you with guidance based on our experience.

Follow-Up on Potential Warranty Work
A typical yard warranty, exclusive of equipment manufacturers warranties, is for one year. There are exceptions to this in certain circumstances. For example, in the case of a fiberglass boat, several of our clients want an extended guarantee against bottom osmosis.

Regardless of the terms of the warranty, Sparkman & Stephens is prepared to assist you and your captain in evaluating any problems, identifying responsibility, and having the building yard properly execute the remedial work. In the event it is not convenient to return to the building yard, we know of very capable yards worldwide, and would assist you in locating an alternate yard, which is acceptable to the building yard.

Ongoing Technical Support
It is the policy of Sparkman & Stephens to support our yachts and assist their owners regardless of the age of the vessel. For this reason we archive our records for safe keeping, including plans and all technical documents, at the Mystic Seaport Museum in Mystic, Connecticut, in the event a question arises. We have ready access to this technical data.

We are constantly receiving inquiries about yachts designed twenty, forty, or even sixty years ago. Because of our extensive records and well organized archives, we are able to respond to these inquiries factually and expeditiously.

What does this mean to you as an owner? It is important in two respects. First, it is a measure of Sparkman & Stephens commitment to the yacht, and second, anyone who is considering purchasing a Sparkman & Stephens’ yacht regardless of the vintage knows that they will receive the full support and assistance from the Design Department.
Read More..

Window frames are ready for windows

Jumat, 05 Februari 2016

0 komentar
The window frames are finished and another job has  made it off of  my list.

Once I had all the Cherry window frames installed, I wanted to make sure all the window trim rings fit as they should. Im glad I did this, because I had to trim some of the frames to allow the trim ring to fit with the 1/8" clearance the manufacturer recommends. The window frames, like most other things, took up a lot more time than I would have estimated. I was also surprised that building the frames consumed a sheet and a half of Cherry veneer plywood. Only one frame made it in to the wood stove, so there was really no waste. The last time I bought Cherry veneer plywood was when I was building the cabins below decks two winters ago. I guess technology has allowed the plywood manufacturers to alter the veneer as this veneer is extremely thin. I dont even want to guess what fraction of an inch is, but one has to be very careful as sanding through it is not to hard to do. Because I was joining frames together using biscuits, it was critical that the frame faces were perfectly flush so that a light sanding with 220 grit would bring the two surfaces perfectly fair.

 
My system of using blocks, while a pain to install, looks like its going to work out good. If I were to do it over again, I would probably glue the blocks to the hull sheathing vs bolting them in place as I did. I had the chance to glue some blocks in place, and also the chance to remove some glued in place blocks. The glued in place blocks I did remove, split away in the wood instead of the glue failing at the hull sheathing. Id have no problem in the future of relying on a glue to metal joint in this application. Before gluing a block to the hull sheathing, I would recommend one scuffs the primer to give the glue something to grab. The biggest reason I wanted to use blocking was have a situation where I have no metal at all not covered with foam insulation. I have two small areas inside the super structure where the foam broke away from the flange due to my aggressive foam trimming, but that will easily be repaired when I foam the hull to super structure joint this spring. The only other place I have bare metal not foamed is the thickness of the hull skin at the window and door rough opening. Once the window is installed, it will be no bid deal at all to go back with a can of foam and seal this joint.

 The foam guy did a pretty good job overall, but the thickness of the foam was inconsistent at the window opening. While installing the windows, Ill have a roll of fiberglass insulation on hand so we can fill this gap. The metal is not exposed, but as you can see from the picture, the thickness varies. I want the maximum amount of insulation for a comfortable boat as much as I want to eliminate any chance of condensation.

I was going to temporally install the windows to see how they looked, but I soon realized that the more I handled them and had them out of the crate, the more they could get damaged. I had toyed with the idea of permanently installing the windows while the super structure is in the barn, but my gut tells me the move to the launch site and the work to land the super structure could jeopardize the windows.

The next project is building the cabinets for the galley. Im well into the cabinet job and am happy with the size and layout of the galley.


Cheers
Read More..

Hogfish Maximus is ashore for hurricane Danny and TS Erica

0 komentar
Today as I write this post we are sitting on land in the boat yard in Jolly Harbour in Antigua. Tropical storm Erica is making its way past us blowing at least 50 plus knots or more with rain. The Hogfish shakes a bit in the bigger gusts. It could be blowing more but we are hiding behind and a bit below a bunch of bigger deep draft sailboats. The wind is howling through all their rigging. Antigua has been experiencing  its worst drought in recorded history. The rain is very welcome.


We hauled out a few days ago because of the threat of Hurricane Danny that was projected to go over Antigua. 
We are uninsured. Normally we find a good mangrove creek to go up and put out all our 7 anchors and tie as many lines as we can to the shoreline. This we have done for the past five hurricanes we have weathered In Grenada, the Exumas, Abaco,Florida and back home in Spainish Wells in the Bahamas.
In Antigua where I am redoing the deck on Wild Bird there are no soft shorelines. Lots of concrete and expensive boats and docks about. The only good creek to go up is 9 miles away to weather in a very remote place. We would normally go there but we want to be near Wild Bird to look after her. So we have spent a few dollars to come ashore and be 100 away from Wild Bird. She has her masts out and is in a full cradle with boats that are stored the same way. A very secure way of surviving a hurricane.
Being self insured means that since launching Hogfish in 1999 we have put our money in anchor
rodes, chain and anchors. We also have gone to great lengths to stay away from all other boats. Its other peoples boats that normally wreck your well placed and secured boat. Having a shoal draft boat enables us to get away to be by our shelves.
If we had been paying for insurance since 1999 we would have shelled out at least $22,000.00 US to date. So far this is the first time we have gone ashore to avoid being next to boats we would have no control over as to how their owners would tie up. The Yard here is very professional. When I picked it to do the Wild Bird deck Project I made sure they would be able to haul us out too in the event of a storm.
So here we sit. The yard crew loves our boat as all they had to do was to lift us out and place us on the ground. We did not spend the money to power wash off the bottom as we will be back in the water on Friday. The growth here is non stop.

No keel !

Anyone who thinks they can sail a shoal draft boat off shore with a shallow horizontal rudder is foolish.
You need a good deep rudder at sea.


The straps are mandatory. We have sat on the bottom with the tide out for several hurricanes of catagory 1-2 with out moving.


The prop strut is made out of fiberglass. I took this time to take the prop off and grease the shaft so it will be easy to remove under water as I will be getting a new feathering prop next week.


Being off set we get very good prop drive but the drag from this fixed bladed prop is about 1/2 a knot in speed loss. The small keel skeg with its flat end plate is made of solid fiberglass.


The Scheel keel idea


Looks like a Chinese take out box hull shape


Detail of bow anchor set up. We have three different headsails we can set. The 110% roller furling jib.
The staysail behind it set on its removable stay or a large Genoa on the forestay.


The 75lb. Fisherman hangs on this simple piece of hardware.


That little bit of Scheel keel really does wonders


Nice and flat. When the boat is heeled over going to windward that chine becomes a vee shape so no pounding. A vee bottom bow when heeled becomes flat so lots of pounding.


 Gayle with our new Bruntons Auto prop that is coming from England. Tim Bought it on EBay for us for $783.00 and will bring it over next week when he visits. Will let you know how it performs against the old three blade fixed prop. This prop self feathers to engine revs so is supposed to be very efficient under power. I also hope to get back that 1/2 knt. Speed loss under sail.

Would post pictures of the wind if it would really show anything. Todays been a good layday for writing blogs. 
The bad thing about hurricanes is you always wish them to go somewhere else. Somebodys going to end up with them. Tropical storm Erica will be gone by tonight but its heading for the Bahamas and is projected to go over our house in Spanish Wells. Such is life when living and sailing in the bowling alley.
When growing up in California we had to worry about Forrest fires and earth quakes. Not much you can do about them. But you can build a house to go through a hurricane and you can do a lot to save and protect your boat in a hurricane if you are aboard to plan ahead.
Once you have set your anchors and tied your lines then you have to decide to stay aboard or go ashore to a safer place. Once the wind is up over 35 knts there is nothing you can do but sit back and hope for the best. We have stayed aboard for most hurricanes being alone and only in 2-3 of water so we felt the risk was acceptable. Rachel and the kids have stayed ashore when they had a very good place to stay. That hurricane in Grenada was quite exciting for me anchored when the gusts would come across the small bay at over 100 miles an hour. With 7 anchors out Hogfish really did not move around but leaned over at times to 20 degrees in these gusts.
So now we will watch Erica on its path to the Bahamas.
Fortunately we have good people that will close up our house for our old renter. Our place is built to go through storms. We just hope for the best with our plants. 
Will let you know how it all turns out in a week.
Read More..

Copyright © 2014 Boat Plans Mania | Powered By Blogger